Cursive Writing Manual
 |
| Image Source: Poppy Thomas Hill |
Cursive writing is a lost art. But if you are like me and one fo the few people on this planet still interested in the art, scroll and find your favourite letter from this guide to find out how to write cursive letters.
Cursive writing is a lost art. But if you are like me and one fo the few people on this planet still interested in the art, scroll and find your favourite letter from this guide to find out how to write cursive letters.
A a
For capital A:
Hover your writing tool slightly above the bottom line. Start making a shallow dip that begins from the left and ends on the right. Then, extend the right edge upwards, slanting the line slightly as you go and touch the top line at a point. Dive down from the point into another slant line. This time touch the bottom line and reverse your tool on the same line halfway up. Loop around the 2 lines starting from the right and covering the left line with a big circle. Leave the circle with a tail on the right.
For lowercase A:
Hover your writing tool slightly above the bottom line. Start making a shallow dip that begins from the left and ends on the right. This time, extend the right edge into an arch that brushes the middle line. Complete the arch by turning it into a circle by reversing your tool along the same arch first and then dipping it downwards. Leave the circle with a tail on the right.
And so it goes something likes this:
B b
For capital B:
Hover your writing tool a little below the top line. Run it down and curve it upwards on the left before it reaches the bottom line. Keeping the curve, droop it around and over the line you just drew. Bulge it out to resemble a semi-circle and similarly draw another semi-circle right below it.
For lowercase B:
Start at the bottom line. Drag the writing tool up, slightly slanted and before it reaches the top line, curve left and downwards so that it forms a pointed tip. Bring the curve down and right. Make a top-open bulb and close the bulb about 45 degrees from 12 o'clock with a small loop.
And so it goes something likes this:
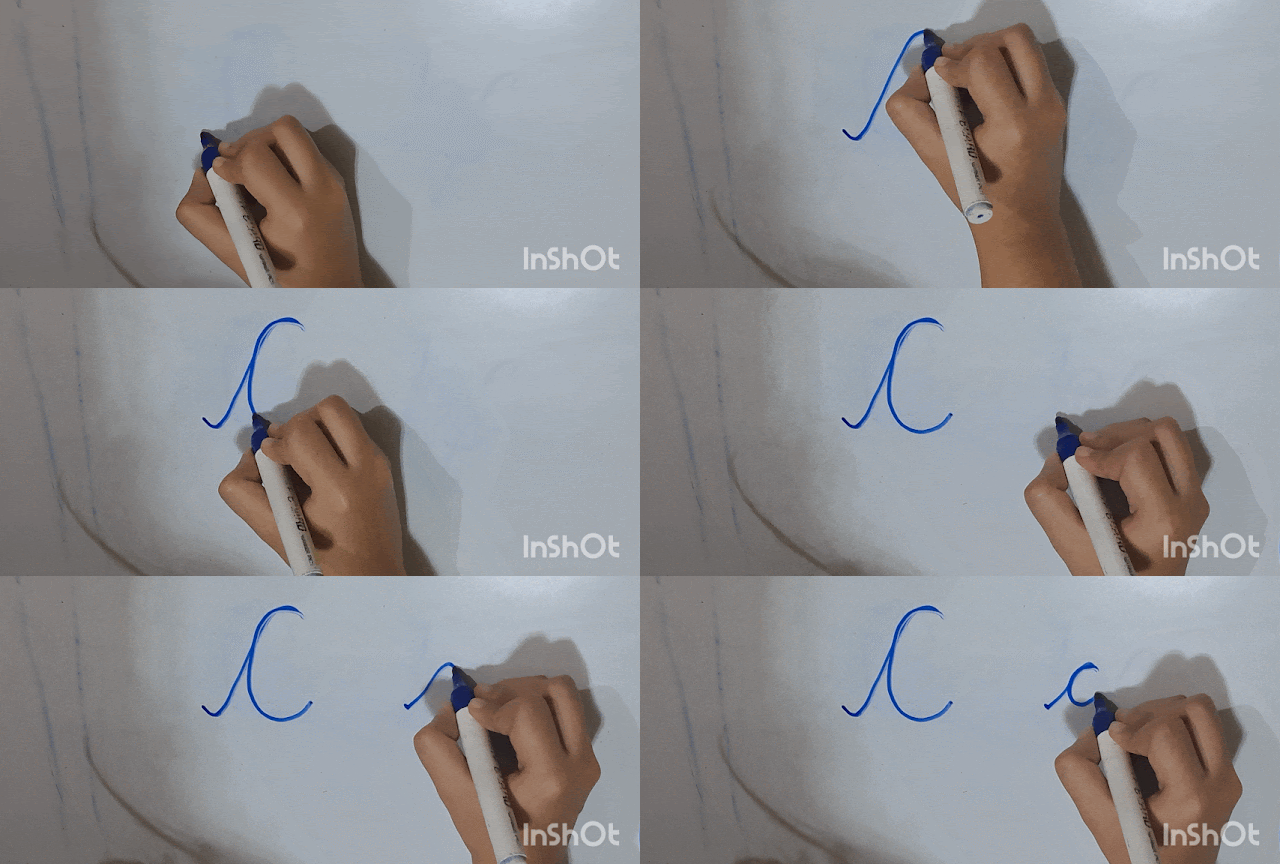
C c
For capital C:
Hover your writing tool slightly above the bottom line. Start making a shallow dip that begins from the left and ends on the right. Extend the right edge in an arch and brush the top line. Draw an incomplete arch by reversing your tool along the same arch first and then dipping it downwards.
For lowercase C:
Repeat the same directions as you did for capital cursive C but make it smaller. (Stop the arch on the middle line.)
And so it goes something likes this:
D d
For capital D:
Hover your writing tool slightly below the top line. Start drawing a slanted line that leans backwards and when you touch the bottom line, cross your line with a loop that stands on the left. Draw a reverse C and finish your capital D by crossing the reverse C into the slanted line.
For lowercase D:
Hover your writing tool slightly above the bottom line. Start making a shallow dip that begins from the left and ends on the right. This time, extend the right edge into an arch that does not brush the middle line but stays a little below it. Complete the arch by turning it into a circle by reversing your tool along the same arch first and then dipping it downwards. Whilst touching the point to complete the circle, extend in the same direction upwards and stop slight before the top line. Leave the letter with a tail on the right.
And so it goes something likes this:
E e
For capital E:Hover near the topmost line. Lean forward at an approx of 50 degrees from 12 o'clock and touch the topmost line. Curve backwards towards the tail and draw a C that ends on the middle line. Draw another C right below it that finishes on the bottom line.
For lowercase E:Start at the bottom line. Lean forward at an approx of 50 degrees from 12 o clock and touch the middle line. Curve backwards and loop leaving a little tail. Continue the curve on the right-hand side and finish it like a lowercase C.
And so it goes something likes this:
F f
For capital F:Start drawing a small wave. At the end of the wave, pull down with a slight curve and bend the curve backwards when it touches the bottom line. Strike the slight curve with a small dash.
For lowercase F:Start at the bottom line. Drag the writing tool up, slightly slanted and before it reaches the top line, curve left. now go down, well below the bottom line and loop upwards and forwards. Reach the meeting point, draw another left loop and drag it down to finish the letter.
And so it goes something likes this:
G g
For capital G:Place your writing tool at the bottom line. Slide it up at a slant and come back down through a loop. Brush the curve on the bottom line and then go slightly up. Run your writing tool down, well below the bottom line and touch the bottom line again with a loop then form down. Finish the letter with a small tail.
For lowercase G:Hover your writing tool slightly above the bottom line. Start making a shallow dip that begins from the left and ends on the right. This time, extend the right edge into an arch that brushes the middle line. Complete the arch by turning it into a circle by reversing your tool along the same arch first and then dipping it downwards. Whilst finishing the circle, extend the meeting tip downwards. Run your writing tool down, well below the bottom line and touch the bottom line again with a loop then form down. Leave the letter with a tail on the right.
And so it goes something likes this:
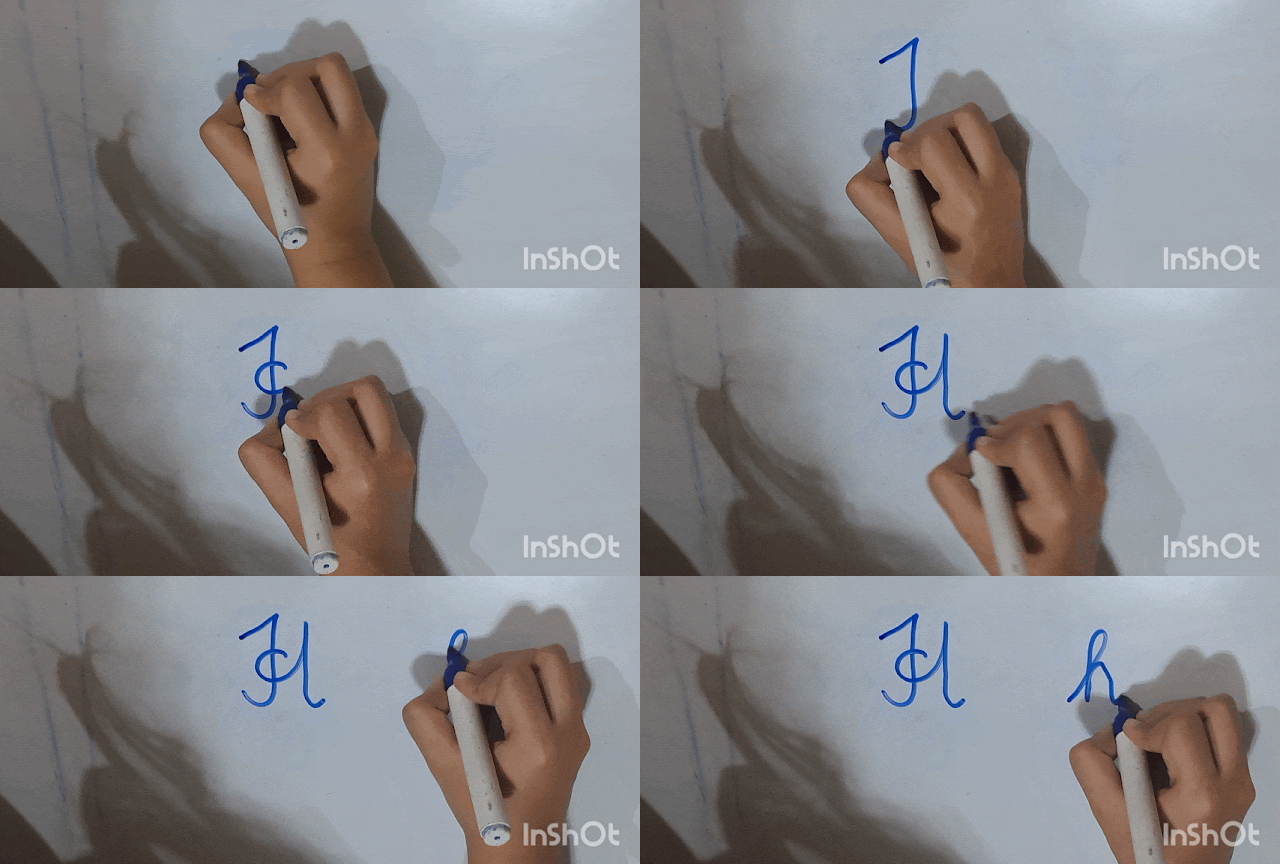
H h
For capital H:Hover your writing tool slightly below the top line. Touch the top line by drawing a slant and hitting a point. From the point, run down and curve backwards at the rendezvous point of the bottom line. Leave a space of 2mm and draw a slanted line that has a forward tail. Draw an incomplete circle by starting on the first line and finishing at the second.
For lowercase H:Start at the bottom line. Drag the writing tool up, slightly slanted and before it reaches the top line, curve left and downwards so that it forms a pointed tip. Bring the curve down, then halfway up and draw an arch. Finish with a tail on the right
And so it goes something likes this:
I i
For capital I:Start drawing a right-angled triangle, angled at 90 at the right by dashing right to left at the upper half of the space between the lines, slanting right and upwards after the stop point and stooping down to meet the triangle. Markdown and form a backwards tail to the letter.
For lowercase I:Start by slanting and then taking the line up and forwards. Reverse a bit on the same line and then draw a forward tail. Finish the letter with a dot a little above the letter.
And so it goes something likes this:
J j
For capital J:Start drawing a right-angled triangle, angled at 90 at the right by dashing right to left at the upper half of the space between the lines, slanting right and upwards after the stop point and stooping down to meet the triangle. Markdown and extend beyond the bottom line. Loop and form a backwards loop to the letter.
For lowercase J:Draw a smaller capital J by following the same directions but stop the tip of the triangle at the middle line. Finish with a dot on top of the letter.
And so it goes something likes this:
K k
For capital K:Hover your writing tool slightly below the top line. Touch the top line by drawing a slant and hitting a point. From the point, run down and curve backwards at the rendezvous point of the bottom line. Then, for the second half of the letter, start a few mms forward at the topmost line. Slant backwards and left and touch the first line in the middle. Draw a small loop and extend the open end of the loop downwards. Finish the letter with a tail
For lowercase K:Start at the bottom line. Drag the writing tool up, slightly slanted and before it reaches the top line, curve left and downwards so that it forms a pointed tip. Bring the curve down, then go halfway up and draw a small semi-circle bulging on the right. Draw the smallest loop and extend the open end of the loop downwards. Finish the letter with a tail.
And so it goes something likes this:
L l
For capital L:Hover near the topmost line. Lean forward at an approx of 50 degrees from 12 o'clock and touch the topmost line. Curve backwards towards the tail and extend down. When you touch the bottom line, cross the line with a loop that stands on the left. Finish the loop by curving it slightly and brushing the bottom line with a curve.
For lowercase L:Start at the bottom line. Drag the writing tool up, slightly slanted and before it reaches the top line, curve left and downwards so that it forms a pointed tip. Bring the curve down and right.
And so it goes something likes this:
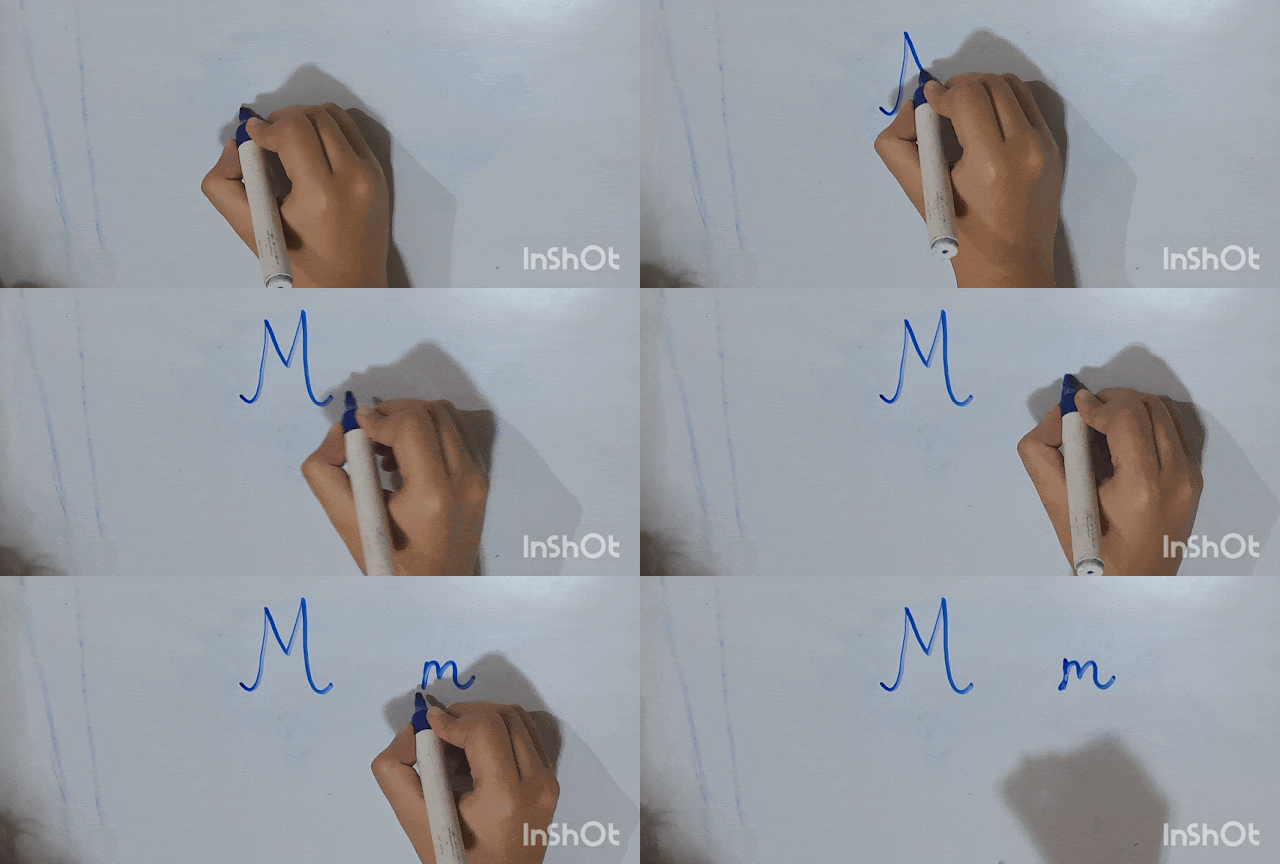
M m
For capital M:Hover your writing tool slightly above the bottom line. Start making a shallow dip that begins from the left and ends on the right. Then, extend the right edge upwards, slanting the line slightly as you go and touch the top line at a point. Dive down from the point into another slant line. This time touch the middle line. From there make another slanted line that leans right. Touch the top line. Bring down the tip by extending it in a slanted right-leaning line and touch the bottom. Finish the letter with a forward tail.
For lowercase M:Start at the bottom line. Go up halfway, and draw a small arch that stops midway between the space. Then draw another arch. But this time, finish the arch at the bottom line. Curve and finish with a tail
And so it goes something likes this:
N n
For capital N:Hover your writing tool slightly above the bottom line. Start making a shallow dip that begins from the left and ends on the right. Then, extend the right edge upwards, slanting the line slightly as you go and touch the top line at a point. Dive down from the point into another slant line. This time touch the bottom line. Draw another slanted, right-leaning line that touches the top line but brushes it with a curve.
For lowercase N:Start at the bottom line. Go up halfway, draw a small arch and finish the arch at the bottom line.
And so it goes something likes this:
O o
For capital O:Draw a bulb by starting at the top line and drawing a full circle. Loop and finish with a tail on the top right.
For lowercase O:Follow the same directions as you did for capital O but start at the middle line instead of the top. (Finish the tailed loop at the middle line as well.)
And so it goes something likes this:
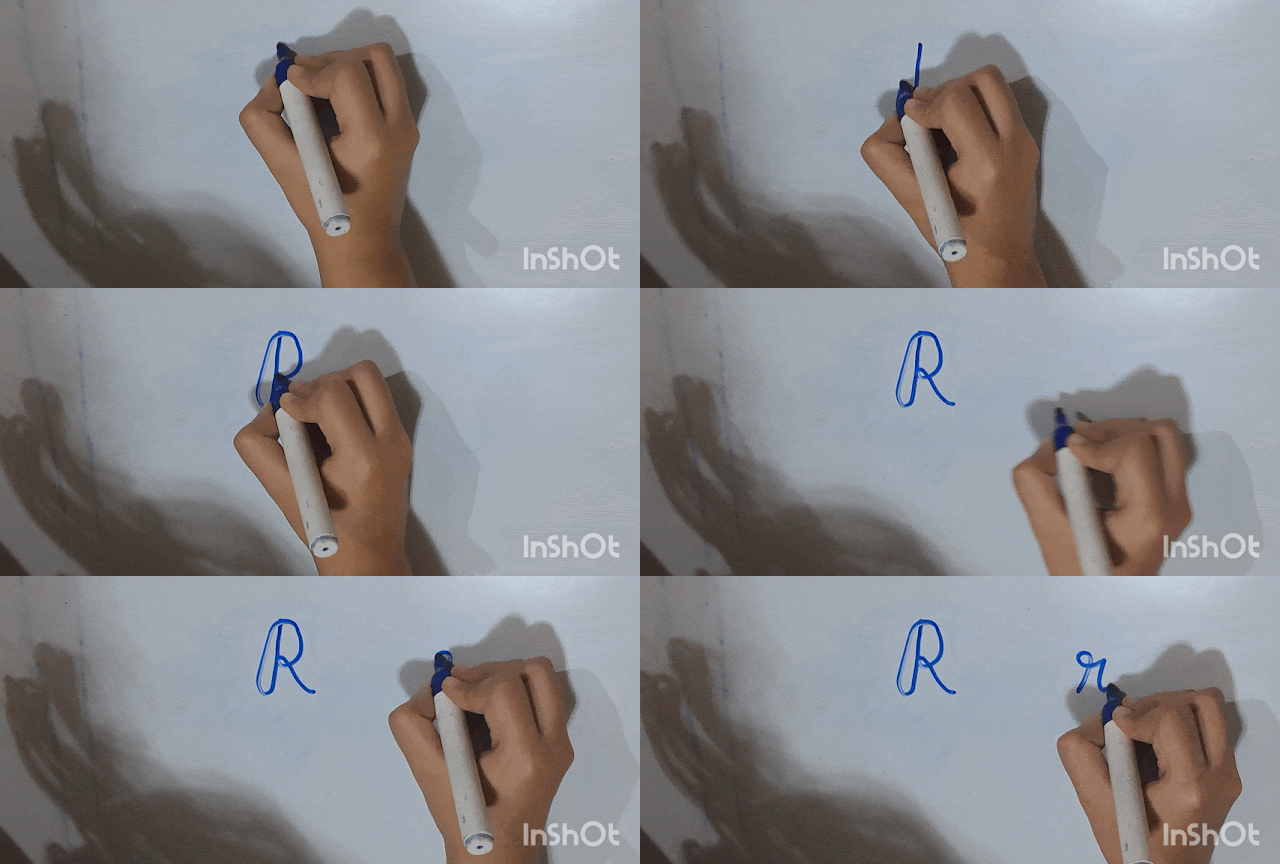
P p
For capital P:Hover your writing tool a little below the top line. Run it down and curve it upwards on the left before it reaches the bottom line. Keeping the curve, droop it around and over the line you just drew. Bulge it out to resemble a semi-circle.
For lowercase P:tart at the bottom line. Drag the writing tool up, slightly slanted and before it reaches the top line, curve left and downwards so that it forms a pointed tip. Bring the curve down and extend it beyond the bottom line. Meet the rendezvous point by going up and drawing an arch that finishes on the bottom line. End the letter with a small tail on the forward
And so it goes something likes this:
Q q
For capital Q:
Draw a bulb by starting at the top line and drawing a full circle. Keep going on the circle till you reach the point that is -90 degrees from 12 o'clock. From there, draw a wave that dips down and leans right.
For lowercase Q:
Hover your writing tool slightly above the bottom line. Start making a shallow dip that begins from the left and ends on the right. This time, extend the right edge into an arch that brushes the middle line. Complete the arch by turning it into a circle by reversing your tool along the same arch first and then dipping it downwards. Once you complete the circle, go traight down with your writing tool and make a small steep valley to finish the letter.












Comments
Post a Comment